.png)

Travel Tips
Deciding what to pack and what to leave behind can be a complete minefield. Here are some tips to make it easier.
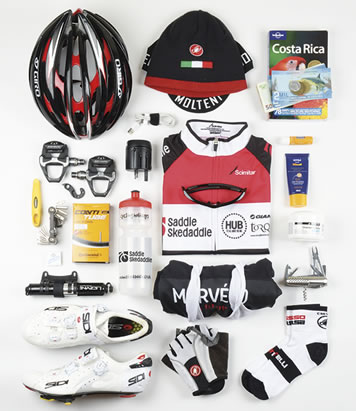
If your baggage allowance can handle it, consider taking two pairs of cycling shoes. If it rains heavily one day and your shoes get soaked, they may not dry completely overnight. There's nothing worse than putting on wet shoes at the start of a ride.
Pack one pair of shoes and some riding kit in your bike bag. It means you can definitely ride on day one if your suitcase doesn't make it at the first attempt. If you've got cycling shoes with cleats - bring your own pedals. It's amazing how many folks turn up without them!
Three sets of kit is usually fine if you have to travel light, four for longer trips - remember you might be visiting a country where the weather is varied, and clothes might not dry in a single night.
Don't forget your padded shorts and a pot of anti-friction chamois cream. They will help keep your bottom happy. Some people prefer to use cycling shorts from a variety of different manufacturers with different shaped inserts. If you experience soreness after a long ride, you can switch to a different pair of shorts and hopefully avoid further irritation and rubbing in the same place day after day.
Hope for the best, plan for the worst. A gilet, windproof jacket, arm and leg warmers are a must, but also take a long-sleeved jersey, bib-tights and overshoes just in case. Far better to have them than not if the weather turns cold and wet. Never travel without long-fingered cycling gloves. Even on a bright day the temperature can plummet in the high mountains. Descending with cold fingers is never fun and can effect braking ability.
Bring your favourite comfy clothes to lounge around in at the end of the day. Weirdly nothing feels better after a mucky day in the saddle than pulling on clean, dry socks.
Wet-wipes and hand sanitizer are really useful to carry in your rucksack or back pocket allowing you to give your hands a quick clean before eating - the best way to avoid a dodgy stomach when you are on holiday.
Don't forget to pack your multi tool, tyre levers, spare tube, patch kit and mini pump. Our staff and vehicles on our guided and supported tours are equipped with comprehensive tools and spares kits, but most minor mechanical issues can be dealt with on the roadside if you're carrying the right equipment.
A comprehensive trip-specific packing list is available for all Skedaddle trips on request.
How to pack your bike for its holiday
The first thing to remember is this simple motto: Plan for the worst, hope for the best!
It's important to pack your bike properly if you're going to fly with it. There are a number of options of how to pack it up (and the 'best way' is a source of argument/discussion amongst cyclists), but here's the Skedaddle way.
The first thing to do is decide what kind of bike box you want/need
There are 3 basic options:
- Cardboard bike box. Normally available for free from your friendly local bike box. Won't stand up to more than a couple of flights and don't like getting wet (obviously)
- Soft padded bike bag. Good value (less than £100), can be re-used for years and years, offers decent protection to your bike if you pack it properly.
- Hard plastic case. Heavy duty and strong, but expensive to buy and can weigh 8kgs when empty (which eats into your weight allowance). If you use a hard case, each case has a quite specific set of packing instructions, so it's best to follow the manufacturer's recommendations rather than the ones below.
DIY or PSE (Pay Someone Else)
Most local bike shops will pack up your pride and joy for you for a fee (somewhere around £30 is pretty typical). If you're short on time, this could be the best option, but you need to consider whether they'll do it the way you'd like it packed?
The DIY route takes longer (45mins to 2 hours depending on how experienced you are and how pedantic you are about getting it perfect), but it's cheaper and you know exactly how it has been done, so you can be confident your bike will arrive in one piece at the other end (fingers crossed...)
DIY route - what you'll need
- A box of some description (ask nicely at your local bike shop and they might give a cardboard box for free; buy a soft bag from most good bike retailers).
- Packing Materials - Have plenty of packing materials (bubble wrap, plumbers lagging foam, re-usable zip ties, packing tape, plastic axle spacers - normally available for free from your local bike shop too)
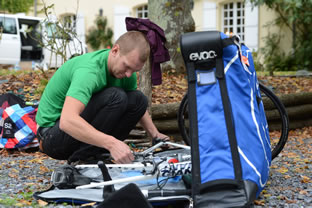
- Plenty of patience - You probably ought to allow 2 hours to pack your bike into the box the first time you do it. Each time you do it you'll get slicker and in the end you'll be able to do it in 30 minutes with your bare hands at the side of the road outside a dusty airport somewhere in the mountains...
Taking your bike apart
Before you start, it's worth noting that it's easiest to either work on your bike with its wheels on the ground, or by putting it in a bike stand (if you have access to one)
- Take the pedals off. Make sure you've got a good quality 15mm pedal spanner or an 8mm long handled Allen key for this. Try and always put a little grease on the threads when you fit the pedals so that when you come to take them off it will be easier. TOP TIP - Stand the bike on the ground on its wheels. Both pedals now undo towards the back of the bike - remember - bike on its wheels, both pedals undo towards the back.
- Put the chain in the largest gear at the front and the smallest cog at the back. This means the chain now runs around the outside of the large chainring and will help protect the teeth from getting bent. Fix a piece of plumbers lagging (lined with cardboard) around the bottom part of the chainring to protect it from the teeth getting bent.
- Remove the seat post and saddle. Wrap both in bubble wrap.
- Remove the wheels. Take out the quick releases (or remove the bolt-through axle on some mountain bikes) and wrap them in bubble wrap or put in a jiffy bag. Let a little air out of the tyres, but if you're running a tubeless tyre set-up then only let out a few PSI (otherwise you risk the tyres unseating themselves from the rims). If you have disc brakes, it's worth removing the disc rotors. Wrap them in bubble wrap or place them in a jiffy bag. Make sure you put the rotor bolts or centre lockring into an envelope and store with the rotors. It's a good idea to wrap bubble wrap around each end of the wheel hubs too, to stop them getting damaged.
- For bikes with disc brakes, add a little plastic spacer or piece of thick cardboard between the calipers - this will stop the pistons from being pushed out if the brake lever is squeezed during the flight.
- Put a plastic or metal spacer between the fork and frame dropouts - you can often get free plastic ones from your local friendly bike shop. This stops the frame/forks from being squashed together during the flight.
- Either remove the rear derailleur with a 5mm Allen key, wrap it in bubble wrap or place it in a jiffy bag and attach it to the frame with a reusable zip tie or simply rotate it forwards, pad it with bubble wrap and tape/zip-tie it to the chainstay to stop it moving about.
- Use plumbers insulation or bubble wrap and carefully wrap all the tubes of the bike frame and forks. Hold the wrapping in place with reusable zip ties. Make sure every tube is wrapped. This might seem a little over the top but it will prevent the frame from getting scratched or dented during the flight.
- Remove your handlebars by undoing the front plate of the stem. Replace the front plate and all its bolts. Wrap the handlebars in bubble wrap then rotate them through 90 degrees so that they are now vertical. Check that none of the cables/hoses are kinked/pinched/trapped (you may need to unbolt the front brake lever on longer mountain bike handlebars to stop the front brake hose/cable from being kinked). Strap the handlebars to the fork leg with tape or some reusable zip ties.
- Once your bike is wrapped securely, you're ready to put it into your box/bag. If you're using a cardboard box, you will need to fit the bike into the box first and then slot the wheels down either side. If you're using a padded bag, they often come with padded wheel bags or padded side pockets that the wheels fit into.
- Once your bike is in, don't forget to add the seatpost, disc rotors, pedals etc, along with any tools that you'll need to rebuild it (Allen key, pedal spanner etc) and some spare packing materials for the flight home.
- Then securely close the box/bag. If you're using a cardboard box, run a double layer of packing tape right around the top edge of the box and put some cross pieces over the top from one side to another). If you're using a padded bag, it's worth closing the zips with a small zip tie - this will stop items falling out, but security staff will still be able to access the bag if they need to.
Top tips
- Don't pack your bike the night before your flight! It's also worth having a practice run the weekend before if it's the first time that you've done it. This way you'll also get an idea of how much your bike and box/bag weighs.
- Remember to take a spare rear mech hanger as you may struggle to find a replacement locally. It's also worth taking spare disc brake pads.
- If your mountain bike has an air fork or an air shock, don't forget to carry a shock pump!
- Pack your helmet, shoes and pedals in your hand luggage, so that if necessary you can hire a bike if yours is missing, late or damaged.